Your First Module with C++
For our first module, we will make a simple low-pass filter, with one big knob to control the cut off frequency.
First create your new project by creating a directory and populating it with a simple template.
For simplicity, do it from the eurorack-blocks/samples directory. We will explain later why.
MyMac:~/eurorack-block $ cd samples
MyMac:~/eurorack-blocks/samples $ mkdir LowPass
MyMac:~/eurorack-blocks/samples $ cd LowPass
MyMac:~/eurorack-blocks/samples/LowPass $ erbb init --name LowPass
MyMac:~/eurorack-blocks/samples/LowPass $ erbb configure
If you are using Xcode open project_vcvrack.xcodeproj in the artifacts folder.
Note
In the following source code files, we have removed all comments to keep the file easy to read for this tutorial.
Let’s now add the pot with a big knob, by editing the Lowpass.erbui file,
as highlighted in the following erbui source code:
// LowPass.erbui

module LowPass {
   width 12hp
   board kivu12
   material aluminum
   header { label "LowPass" }

   control freq Pot {      // 1
      position 6hp, 34mm   // 2
      style rogan, 6ps     // 3
      label "FREQ"         // 4
   }

   control audio_in AudioIn {
      position 6hp, 96mm
      label "IN"
   }

   control audio_out AudioOut {
      position 6hp, 111mm
      label "OUT"
   }
}
Add a pot and give it the name
freq(we will see how names are used later)Give it a position, first is on the horizontal axis, and second is on the vertical axis. Note that both have units, with
hpbeing the Eurorack HP for convenience. Since half of 12HP is 6HP, this will place the pot at the horizontal center in the moduleLet’s give it a specific style, which here is the knob style.
roganis the brand of the knob used in many Mutable Instruments and Make Noise modules, and6psis the Rogan manufacturer part name. You could use herexlargeinstead. The style is optional, so you can remove this line and the engine will select one default style for you.Give it an optional label, which will be printed on the front panel aluminum.
You can already build the project using ⌘B and run VCV Rack to see what it looks like.
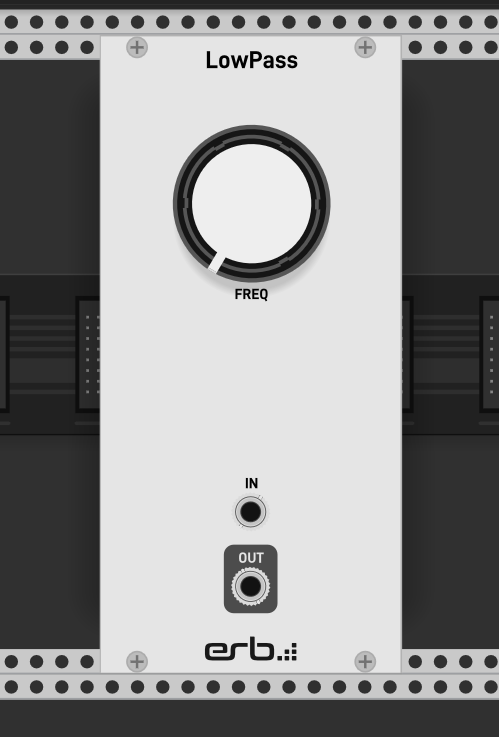
You can connect inputs and outputs, and you can hear that the input goes on the output but moving the FREQ knob doesn’t have any effect.
Let’s now take care of this.
First we need a DSP implementation of a low-pass filter. This is why we created the project
inside the samples directory: in the samples directory, there is also a small DSP library
to be able to test Eurorack-blocks quickly, and it contains a low-pass filter!
First we will add this library by editing the build system file LowPass.erbb.
// LowPass.erbb

module LowPass {

   import "../dsp/dsp.erbb"

   sources {
      file "LowPass.cpp"
      file "LowPass.h"
      file "LowPass.erbui"
   }
}
This line includes the content of the the dsp.erbb file contained in the samples/erb directory.
The .. tells the build system to look on folder upper (which is the samples directory),
and then look for dsp in this samples directory and finally dsp.erbb.
Important
Everytime you change your project erbb file, don’t forget to run erbb configure!
Now we can use all the classes defined in this Library.
Let’s update LowPass.h to add the dsp/Filter2Poles.h header, and an instance of it:
// LowPass.h

#include "artifacts/LowPassUi.h"
#include "artifacts/LowPassData.h"

#include "dsp/Filter2Poles.h"

#include "erb/erb.h"

struct LowPass
{
   LowPassUi ui;
   LowPassData data;

   void  init ();
   void  process ();

   dsp::Filter2Poles filter;
};
struct LowPass represents your module. Let’s go now through its content:
LowPassUi uirepresents your UI front panel elements. We will see later how to access themLowPassData datarepresents resources of your module, such as audio samples. We will see in another tutorial how to use itvoid init ()is a function that gets called once when your module first starts. If you are familiar with Arduino, this is equivalent to theirsetup ()methodvoid process ()is a function that gets called regularly every time some audio is available on input and some audio needs to be given on output. If you are familiar with Arduino, this is somehow equivalent to theirloop ()method
Let’s now move to LowPass.cpp to configure the low pass filter and use it.
// LowPass.cpp

#include "LowPass.h"

void  LowPass::init ()
{
   filter.set_sample_freq (erb_SAMPLE_RATE);
   filter.set_type_low_pass ();
   filter.set_resonance (1.f);
}

void  LowPass::process ()
{
   float freq_hz = 20.f * std::pow (1000.f, ui.freq);
   filter.set_freq (freq_hz);
   filter.update ();

   for (size_t i = 0 ; i < erb_BUFFER_SIZE ; ++i)
   {
      ui.audio_out [i] = filter.process (ui.audio_in [i]);
   }
}
In the init function, we configure the filter. We tell the filter that the sampling rate is
erb_SAMPLE_RATE. This macro is set automatically to the sample rate of the platform.
Then we tell this filter that it is a low pass filter, with a resonance of 1.
In the process function, this is where all happens. Every erb_BUFFER_SIZE samples,
which is 48 samples by default, this function gets called.
We first get a reading of the components of the front panel, for example here our pot.
Remember when we gave the control name freq? This is where it is used.
Eurorack-blocks will automatically generate the ui content, and populate it with
our freq control. And we can access its value by simply using ui.freq.
This value is normalised, meaning its range is between 0 and 1: 0 when the pot cursor is completely on the left, 1 when the pot cursor is completely on the right. If you could perfectly put the cursor at the center, it would give a value of 0.5.
Because the frequency psychoacoustic perception follows a logarithmic scale, we calculate
a Hz value with that logarithmic scale. When ui.freq is 0, then the expression evaluates
to 20Hz, and when ui.freq is 1, then the expression evaluates to 20kHz. Anything in
between follows a natural range to our ears.
We then configure our filter with this new frequency, using set_freq ().
Finally we update our filter so that it can recalcuates its internal coefficients.
Now the filter is ready to process sample data, and this is what we do on the next lines.
We loop over the audio buffer, and get one sample from the input using ui.audio_input [i].
If you look at your LowPass.erbui file now, you will see that we have an AudioIn control
with the audio_in name.
This input value goes through the filter process function, and the return value, is written
to ui.audio_output [i].
Similarly, if you look at your LowPass.erbui file now, you will see that we have an AudioOut control
with the audio_out name.
You can already build the project using ⌘B and run VCV Rack to see what it looks like.
Important
Don’t forget to set your VCV Rack Audio Output to 48kHz!
Why do we need to set the audio output to 48kHz? This is because Eurorack-blocks controls the audio sample rate to ensure that how it sounds in VCV Rack is the same as how it sounds on the hardware platform, and also because the hardware platform only supports some specific sample rates.
You can read more about sample rates and latency in the Target Audio Configuration section in this manual (coming soon).
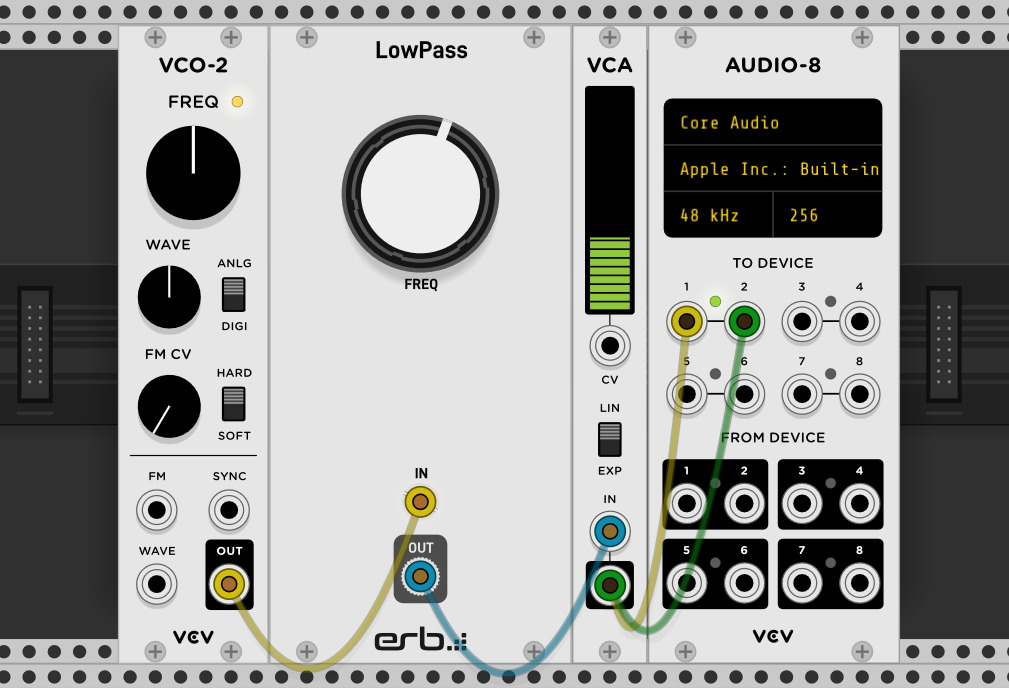
You can test your plug-in with this typical configuration. Don’t forget to put a VCA as a pure VCO output can be quite loud!
You will get the following result, and moving the “FREQ” knob will change the sound as expected!