Drop: Getting to Know Controls
Drop
is a sample to illustrate a simple module, yet using quite a lot of different Eurorack blocks controls,
like buttons, trim pots, gate inputs, LED with one or more colors.
Watch the short video below to have a quick grasp on what this module can do:
Overview
This module allows to make a typical “techno drop”.
When active, the stereo input is either muted or goes through a high-pass filter.
The latter cutoff frequency can be controlled with the FREQ pot,
and can be used to selectively remove the drum kick frequencies.
When passive, it is just a bypass.
The transition from passive to active or active to passive is armed with the ARM button or gate.
The actual transition only happens when the transition is armed and a SYNC trigger is received.
Typically, the SYNC gate input would be connected to a clock divider with appropriate reset,
so that the SYNC is triggered only on beats or bars.
As you can see it is quite a complete module in a way, with lots of different controls. At the end of this page, you will handle most of the Eurorack-blocks project.
For the rest of this tutorial, if you want to follow along, we will consider that you have setup your environment properly as described in ../getting-started/setup.
Preparing
First let’s configure the IDE project to inspect the project in the comfort of our IDE if you
are using one. Navigate to eurorack-blocks/samples/drop and run:
eurorack-blocks$ cd samples/drop
eurorack-blocks/samples/drop$ erbb configure
If you are using Xcode, you can navigate to the artifacts folder and open the
project_vcvrack.xcodeproj Xcode project.
If you are using VSCode, just open the drop folder in VSCode.
From Xcode, you can build using ⌘B. You can also build the VCV Rack module from the command line with:
$ erbb build simulator
Now you can open VCV Rack, and add the Drop module and play a bit with it.
Quick Look at Erbui
We will go quickly on this part, as we plan to make a GUI editor (coming soon). With the
GUI editor, learning erbui becomes quite superfluous.
erbui is a declarative domain specific language used to describe a module user interface.
It is mostly a collection of control elements, with each control representing a physical
piece of hardware on the panel. For example you can have a control for a pot and its knob,
a control for a button, but also a control for gate inputs and outputs, CV inputs and outputs,
audio inputs and outputs, or even LEDs with either one or multiple colors.
Position and style
Every control as at least a position and optionally a style attribute, for example:
control sync_button Button {
   position 2hp, 75.3mm
   style ck, d6r, black
}
The first argument of the position,
2hp expresses the distance between the left side of the board to the center of the control,
on the horizontal axis.
Similarly, 75.3mm, expresses the distance between the top side of the board to the center of the control,
on the vertical axis.
Those distances always come with a unit, like hp, mm or cm.
A hp is the Doepfer defined
Eurorack HP distance, which defines 1HP = 5.08mm.
The arguments of style, ck, d6r, black, define the hardware component to use.
Here, ck, d6r, black denotes the
C&K D6 series,
variant R (round button), in black color.
The style is dependent on the control type, here Button. For each control type, you can
visit its control reference, which lists the available styles. For example here is the control
reference for Button.
Label
An optional label can be added to the control. This will be shown on the front panel, for example:
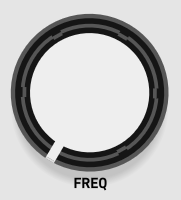
control freq_pot Pot {
   position 6hp, 34mm
   style rogan, 6ps
   label "FREQ"
}
This will place the label automatically below the pot, while taking into account here the size of the knob attached to the pot.
The default label positioning is dependent on the parent control. For example for the jack connectors, the default placement label placement will be done on the top of the control.
The label positioning can be customized, and even multiple labels can be associated to the same control, for example:
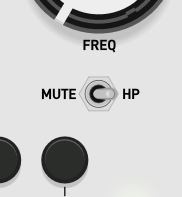
control mute_hp Switch {
   position 6hp, 62mm
   style on_on
   rotation 90°ccw
   label "MUTE" { positioning left }
   label "HP" { positioning right }
}
Using the Control API
Pots and Trims
Controls defined in the erbui file all have a name. For example the big knob with label
“FREQ” as the name freq_pot as highligthed here:
control freq_pot Pot {
   position 6hp, 34mm
   style rogan, 6ps
   label "FREQ"
}
This name can then be used inside your code to retrieve the rotational position of the pot.
Let’s now open the Drop.cpp file to see how to bind your control elements to your DSP.
float freq_norm
   = float (ui.freq_pot)
   + float (ui.freq_cv) * float (ui.freq_trim);
if (freq_norm > 1.f) freq_norm = 1.f;
if (freq_norm < 0.f) freq_norm = 0.f;

float freq_hz = 20.f * std::pow (1000.f, freq_norm);
dsp.set_highpass_freq (freq_hz);
}
You can retrieve the freq_pot value by converting it to a float.
By default, the Pot class is unipolar or normalized: its value ranges from 0.f to 1.f
where 0.f denotes the rotational position where the knob cursor is fully on the left,
while 1.f denotes the rotational position where the knob cursor is fully on the right.
If you could place the knob cursor exactly on the center position, it would return 0.5f.
Said differently, the angle of rotation is linearly mapped to a value between 0 and 1.
Sometimes you however want the center position to be 0, the leftmost position to be -1 and the rightmost 1. This is the case for example, when using a trim pot that should act like an attenuverter, a case very common in Eurorack when you want to attenuate an incoming CV, and potentially invert it as well.
control freq_trim Trim {
   mode bipolar
   position 10hp, 75.3mm
   label "–/+"
}
You can simply specify the mode attribute and set it bipolar. Now float (ui.freq_trim)
will return a bipolar value, between -1 and 1, linearly mapped to the angle of rotation.
float freq_norm
   = float (ui.freq_pot)
   + float (ui.freq_cv) * float (ui.freq_trim);
if (freq_norm > 1.f) freq_norm = 1.f;
if (freq_norm < 0.f) freq_norm = 0.f;

float freq_hz = 20.f * std::pow (1000.f, freq_norm);
dsp.set_highpass_freq (freq_hz);
}
Finally the entire code takes the freq pot position, and adds it to the cv value (if a cable is connected), and attenuates it with the trim bipolar value. We finally clip the normalised frequency value and calculate the corresponding Hz value before we tell the DSP which frequency to use for its high-pass filter cutoff frequency.
Buttons and Gates
Not all control elements produce a continuous value. Some like buttons or gates produce a discrete value represented as a boolean.
But sometimes you might want to know when a button was just pressed or a gate was just triggered. For this the control implements this information as part of its API:
if (ui.arm_button.pressed () || ui.arm_gate.triggered ())
{
   dsp.toggle_arm ();
   ui.arm_led.pulse ();
}
Here, we have a condition that only is true if the button was just pressed or the gate
was just triggered: on the next process call those conditions would be false, so that
you can detect some event (for example the user pressed the button), exactly when it
happened.
But if you would want to take some action when the button would be held for example,
you could then use the held function for that. You could also want to know what is the
state of the gate at any point of time by converting it to a bool.
LEDs
We have been talking only about control from which you can retrieve a value. But control for which you set a value is also supported, for example a LED.
You can set a Led value to set its intensity.
But a lot of times, you want for example to pulse a LED shortly, or pulse it 2 times quickly, or even make it blink.
For this, Eurorack-blocks as a small built-in animation system that will change the LED intensity accordingly with just one call to its API.
if (ui.arm_button.pressed () || ui.arm_gate.triggered ())
{
   dsp.toggle_arm ();
   ui.arm_led.pulse ();
}
Here, when the ARM button is pressed or the ARM gate is triggered, we will pulse the ARM LED to give some feedback to the user.
Pulse, blink all have default timing values we think are good in most cases. If you want to change them, you can specify the pulse duration or blink period when calling those functions.
Eurorack-blocks supports also LED with more than one color: dichromatic LEDs are pretty common in the Eurorack world.
switch (state)
{
case DropDsp::State::None:   ui.state_led.off (); break;
case DropDsp::State::Off:    ui.state_led.on (erb::ColorBi::green ()); break;
case DropDsp::State::Armed:  ui.state_led.blink (erb::ColorBi::yellow ()); break;
case DropDsp::State::Active: ui.state_led.on (erb::ColorBi::red ()); break;
}
You can specify a color for those LEDs. But if you want even more control, you can specify values for the red and green components of this dichromatic LED by accessing its properties. For example:
ui.state_led.r = 0.5f;
ui.state_led.g = 1.f;
Would make the red portion of the LED half dimmed, and make the green portion fully on.
Audio Buffers
Last but not least, let’s talk about audio buffers. Every time your process function is
called, you will receive some audio samples from the input if you have one (or more) and
you need to send some audio samples back to the output if you have one (or more).
Audio buffers are a bit different than all the other input controls. For example a Pot control
has the same value during the entire process function. But an audio buffer will contain
as many samples as your module latency, which is defined in erb_BUFFER_SIZE
const float * const in [] = {
   &ui.audio_in_left [0],
   &ui.audio_in_right [0],
};

float * const out [] = {
   &ui.audio_out_left [0],
   &ui.audio_out_right [0],
};

dsp.process (out, in, ui.audio_out_left.size ());
Here we have an example of a DSP function which takes pointers to pass the inputs to the DSP process function, and be able to retrieve the outputs.
This is quite common in the DSP world, while you need extra caution when using pointers on an embedded platform, for reasons we will see later when talking about memory management.
In the example above, ui.audio_in_left [0] retrieves a reference to the first sample
in the audio buffer.
Another way to write code, if you do sample per sample processing could be:
for (size_t i = 0 ; i < erb_BUFFER_SIZE ; ++i)
{
   float in_left = ui.audio_in_left [i];
   float out_left = do_something (in_left);
   ui.audio_out_left [i] = out_left;
}
That’s it! We have covered most controls of Eurorack-blocks. We didn’t talk about the
Switch, but you can read its API in the Controls Reference section. It follows the same
principle that the rest of the controls.